Here is a procedure to create a very simple WebBrowser in Visual Basic 2008 with less than 7 lines of code. Just follow the given steps, (remember this is only to create a simple one and pls don’t expect it to be in par with good ones. Just uses IE control of the system, these steps assume that you are relatively new to VB environment). Click the pictures to get an enlarged view of it.
Open Visual Basic 2008
Select File->New Project
Enter the name of the New Project As “WebBrowser”

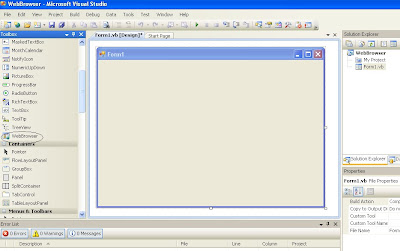
Select the “Web Browser” Control from the Toolbox.

Your window should now look as below, in that select the WebBrowser Component(default name is ‘WebBrowser1’ and in the “Properties” window in the right side of your side change the Dock property to value None as shown in the figure below.

Now you can resize your WebBrowser as per your wish. Now create 5 command boxes and 1 TextBox from the toolbox. The following pictures demonstrate the procedure,

Just click the controls and drag it in the form and resize it as per your wish,
Then set the “Text” property(you can change the property of a control from the properties pane in the right side with the control clicked), change the name of the first command box to “Back” second one to “Forward” third one to “Stop” fourth one to “Refresh” and fifth one to “Go”. Then place the controls at the appropriate places. The completed form will look like this,

The controls along with their name property (in quotes) is given below
Back – “Button1”
Forward – “Button2”
Stop – “Button3”
Refresh – “Button4”
Go – “Button5”
Textbox – “TextBox1”
WebBrowser – “WebBrowser1”
Now double click the Button1(back button) and enter the following code,
WebBrowser1.GoBack()
Now your code window should like this,

Similarly double click the button2(forward) and enter the following code
WebBrowser1.GoForward()
Double click button3(stop) and enter the following code,
WebBrowser1.Stop()
Double click button4(Refresh) and enter the following code,
WebBrowser1.Refresh()
Double click button5(Go) and enter the following code
WebBrowser1.Navigate(TextBox1.Text)
Double click the webbrowser control and enter the following code in its “DocumentCompleted” event,
Me.Text = "WebBrowser - " + WebBrowser1.DocumentTitle
Your final code window should look like this,

Now press F5 to run your project and your Simple Web Browser is ready for usage.
Final page looks like this

Have Fun. Do drop in your comments and queries.


